ads2

Showing posts with label cisco. Show all posts

Tuesday, 2 September 2014

IP Unnumbered Explained

In this tutorial we will take a look at IP unnumbered and how to configure it. First of all…what is IP unnumbered and why do we need it?
On a router each interface requires a unique IP address so it can install an entry in the routing table and process IP packets. IP unnumbered allows you to process IP packets without configuring a unique IP address on an interface, this works by “borrowing” an IP address from another interface.
Why would you want this and not just configure an IP address on the interface? To answer that question we have to dive into the past.
Once upon a time we didn’t have VLSM (Variable Length Subnet Mask) and we used classful routing protocols like RIP version 1 and IGRP (the predecessor of EIGRP). This means that the smallest subnet you could use was a /24. When using public IP addresses this is a huge waste of IP space. Take a look at the picture below:
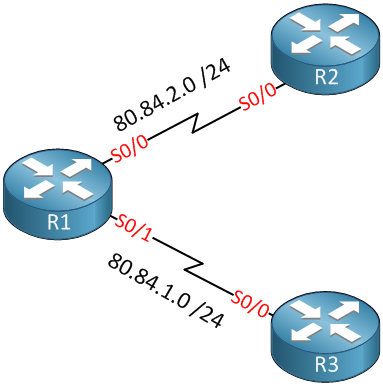
R1 R2 R3 serial links
There are 3 routers connected with each other using point-to-point serial links. We have to use two /24 subnets while we only require 4 IP addresses in total…such a waste!
IP unnumbered was created to solve this problem so you didn’t have to waste entire subnets on point-to-point interfaces. It borrows an IP address from another interface so you don’t have to configure one on the point-to-point interface.

Monday, 17 February 2014

Parser View

With CLI view, we can restrict which access each network administrator have based on role.Superviews allow a network administrator to easily assign all users within configured CLI views to a superview instead of having to assign multiple CLI views to a group of users. 


Here is the basic configuration of the Parser View.


R2 <----> R3    
192.168.1.1   <---->  192.168.1.2


Task: 

  • Allowing telnet access with the username OPERATOR and password CISCO to be able to configure the HTTP feature in the router only.
  • Configure Username ADMIN and password CISCO to have access to every feature in the router.


aaa new-model
!
!
aaa authentication login default local
aaa authentication login VTY local
aaa authentication login CON none
aaa authorization exec default local
aaa authorization exec VTY local


username OPERATOR view HTTP password 0 CISCO
username ADMIN privilege 15 password 0 CISCO


parser view HTTP
 secret 5 $1$6ZRJ$CIjM5cdVUvhpinttlR/361
 commands configure include ip http
 commands configure include ip
 commands exec include configure terminal
 commands exec include configure
 commands exec include show running-config
 commands exec include show

Monday, 20 January 2014

Any Transport Over MPLS (AToM)

Any Transport over MPLS (AToM) will transport layer 2 frames over a MPLS (Multiprotocol Label Switching) network. This will allow service providers to connect layer 2 networks of customers transparently by using their MPLS backbone. AToM can transport the following:
  • ATM AAL5
  • ATM Cell Relay
  • Ethernet
  • Frame Relay
  • PPP
  • HDLC
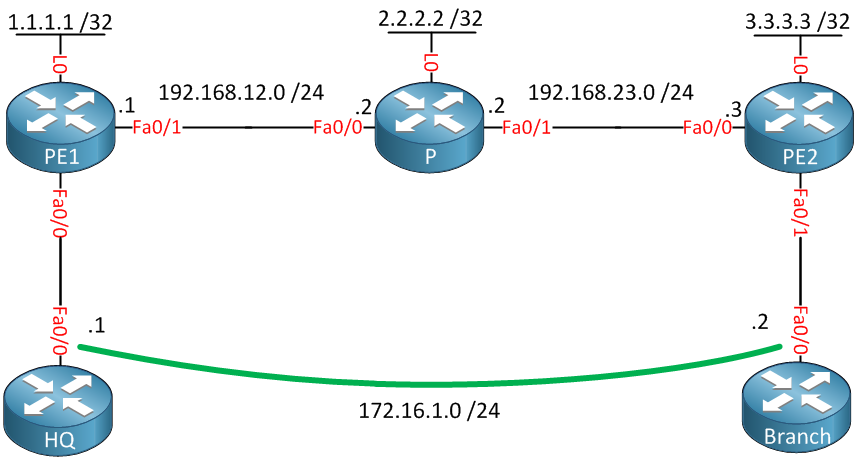
I will give you an example how to configure AToM to transport Ethernet over the MPLS backbone, we will use the following topology to do this:
MPLS Atom Ethernet
Above you see a small MPLS backbone that consists of the PE1, P and PE2 router. This ISP only has one customer that has a HQ and Branch. The customer wants to have the HQ and Branch router to be in the same layer 2 segment.

Cisco IOS NAT on a Stick Configuration Example

NAT (Network Address Translation) is most commonly used to let users on our LAN access the Internet using a single public IP address but it can be used for some more interesting scenarios. Recently I encountered an interesting CCIE R&S task that had the following requirement:
"Make sure that whenever R2 responds to a traceroute it replies with the IP address on the loopback 0 interface"
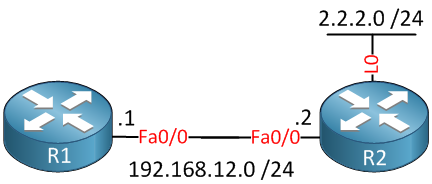
This sounds easy enough but there’s no such thing as a “traceroute source loopback 0″ command or anything alike. To make this work we have to configure the NAT on a stick feature. In this tutorial I’ll show you this is done. First of all, this is the topology that we will use:
Two Routers R2 Loopback Interface
There are only two routers that are directly connected to each other. R2 has a loopback 0 interface with IP address 2.2.2.0 /24. Let’s configure these IP addresses first:

Site-to-Site IPSEC VPN Between Two Cisco ASA – one with Dynamic IP

isco ASA 5500 Series appliances deliver IPsec and SSL VPN, firewall, and several other networking services on a single platform. Cisco ASA 5520, a member of the Cisco ASA 5500 Series, is shown in Figure 1 below.
asa5520 picture
Figure 1 Cisco Adaptive Security Appliance (ASA)

Thursday, 16 January 2014

Site-to-Site IPSEC VPN Between Cisco ASA and pfSense

IPSEC is a standardized protocol (IETF standard) which means that it is supported by many different vendors. Therefore if you want to create a VPN between different vendor devices, then IPSEC VPN is the way to go.
In this article we will see a site-to-site VPN using the IPSEC protocol between a Cisco ASA and a pfSense firewall. PfSense is an open source distribution of FreeBSD customized for use as a firewall and router. You can install pfSense on a PC with two (or more) NICs, essentially turning it into a flexible security appliance. You can obtain your copy of pfSense from the Downloads section of www.pfsense.org. At the time of this writing, the latest available release is 2.0.2 and the same has been used in this tutorial.
In this article, we will focus on site-to-site IPsec implementation between a Cisco ASA and a pfSense firewall, as shown in Figure 1 below.
Figure 1  Cisco ASA to pfSense IPsec Implementation (Click for Larger Picture)
IPsec - ASA to pfSense
We will start with a preconfiguration checklist that will serve as a reference for configuration of IPSEC on both devices. ISAKMP/Phase 1 attributes are used to authenticate and create a secure tunnel over which IPsec/Phase 2 parameters are negotiated.
Table 1   Preconfiguration Checklist: ISAKMP/Phase-1 Attributes

Monday, 13 January 2014

Mpls Vpn review

Hi all, 
I'm completely busy on studying CCIE R&S written but I want to share a mpls vpn lab for reviewing mpls arguments.

Here is the topology:


Task list for this lab is:
-R1-R2-R3-R4-R5-R6-R7 (ISP) cannot elect any DR/BDR to speed up convergence
-Any OSPF area 0.0.0.0 neighbor fault must be detected within 1 second or less (NOTE: if you use dynamips, this requirement can be skipped or "relaxed"..., the high cpu % utilization will bring up/down your adjacency when you perform some operations like enable mpls...)

Mpls Lab #1 : Basic Mpls configuration

Hi all, after a successful BGP exam, now it's time to start with MPLS... nothing better than a basic lab to practice the configurations and show commands.

Here the topology, most of my lab routers doesn't support mpls (2600 series) that's why I used GNS3 with 3600s...

STEP 1: configure all point to point links and use EIGRP with various AS to route all links and loopbacks. Ensure that you can ping every interface from every router.

STEP 2: basic mpls configuration, for each router you must:
-enable ip cef with:

BGPFLAP: a simple tcl script to flap an interface

Hi all,
today I was trying the bgp dampening feature, and I wrote this simple tclsh script to flap an interface during my lab tests:

first, configure an interface with the route to flap:
R3#sh run int lo 10 | beg int
interface Loopback10
 ip address 10.10.10.10 255.255.255.0
end

then configure the network statement for that route under the bgp process: 
R3#sh run | sec router bgp
router bgp 300
 no synchronization
 bgp log-neighbor-changes
 bgp dampening
 network 10.10.10.0 mask 255.255.255.0
 neighbor 192.168.2.1 remote-as 200
 neighbor 192.168.2.1 ebgp-multihop 2
 neighbor 192.168.2.1 update-source Loopback0
 no auto-summary
R3#


and here is the tclsh script, I reccomend a wait time of 40-50 sec with the default bgp timers

Sunday, 12 January 2014

VRRP , An Overview and Implementation

VRRP: Virtual Router Redundancy protocol

To reach remote networks we use the following methods to discover the first hop to our remote network:
  • Dynamic process
  • Static configurations

The problem with dynamic exploration is extra network overhead, and usually static configuration is recommended as it gives the next hop detail in advance thus reducing the extra network overhead. But the problem with static next hop or in simple words default gateway configuration is redundancy as it creates a single point of failure. To overcome this, we use different redundancy configuration techniques, in which we configure a single virtual IP on a group of routers. In case one virtual gateway fails, the load is instantly shifted to the next available router according to priority. VRRP is one of those techniques as are GLBP and HSRP. In VRRP we define a Master Router and a bunch of back up routers; these backup routers are the point of redundancy in case of Master router failure. 

Thursday, 9 January 2014

Configuring NAT Overload On A Cisco Router

Introduction

NAT (Network Address Translation) is a method that allows the translation (modification) of IP addresses while packets/datagrams are traversing the network. NAT Overload, also known as PAT (Port Address Translation) is essentially NAT with the added feature of TCP/UDP ports translation.
The main purpose of NAT is to hide the IP address (usually private) of a client in order to reserve the public address space. For example a complete network with 100 hosts can have 100 private IP addresses and still be visible to the outside world (internet) as a single IP address. Other benefits of NAT include security and economical usage of the IP address ranges at hand.
The following steps explain basic Cisco router NAT Overload configuration. NAT overload is the most common operation in most businesses around the world, as it enables the whole network to access the Internet using one single real IP address. If you would like to know more about the NAT theory, be sure to read our popular NAT articles, which explain in great depth the NAT functions and applications in today's networks.

Tuesday, 15 January 2013

How To: Emulate Cisco ASA in GNS3

In this article, I will show you how to emulate Cisco ASA using Qemu. Once again, please note that ASA is not provided and will not be. So please don’t ask. Also be aware that ASA does not 100% work in Qemu but that’s enough to play with it.
Installation
First compile and patch Qemu as you would do for running JunOS. This will give us pcap, lcap and UDP tunnels (i.e. GNS3/Dynamips connections) capabilities.
Then obtain ASA itself. If you are smart and patient you will find it. I used asa802-k8.bin for my installations. As far as I know, nobody has been able to run ASA > version 8.2 (ASA keeps rebooting).
The next step is to get an initrd and a Linux kernel (inside the initrd) from your ASA image to use them with Qemu and also fix the initrd for our needs. The initrd is zipped and archived in the ASA image, we have to extract it.
There are 2 ways, manually or using a tool I created.
Manual method
Create an hexadecimal dump of your image:
hexdump -C asa802-k8.bin > asa802-k8.hex
Search for the ZIP header:
grep “1f 8b 08 00 1d” asa802-k8.hex
001228b0 1f 8b 08 00 1d 3d 73 46 00 03 ec 3a 6d 54 14 57 |…..=sF…:mT.W|
We can see that the ZIP file starts at offset 1228b0.
Let’s find the image size:
ls -la asa802-k8.bin
-rwxr-xr-x  1 root  staff  14524416 26 Nov 20:14 asa802-k8.bin
14524416 bytes.
Now we need to find out where in the file we can start extracting the ZIP part.
echo "14524416 ; ibase=16 ; last - 1228B0" | bc | tail -n 1
13334352
Extract the zipped part of the ASA image:
tail -c 13334352 asa802-k8.bin > asa802-k8.gz
Decompress it with gzip:
gzip -d asa802-k8
gzip: asa802-k8.gz: decompression OK, trailing garbage ignored
Make a temp directory and go into it so we can extract the files contained in the uncompressed archive file (the initrd):
mkdir tmp ; cd tmp
Now extract the archive with cpio (you must have the administrator rights to successfully extract device files).
cpio -i --no-absolute-filenames --make-directories < ../asa802-k8
Copy the Linux kernel to your previous directory:
cp vmlinuz ../asa802-k8.kernel
Before compressing back the initrd, create the following script in asa/scripts/first_start.sh
This script formats the 256 MB flash on first start to be used by ASA. Loads the network drivers modules for Intel e100 (i82559er in Qemu) and Intel e1000 cards and activates the network interfaces to be used in ASA. I noticed that if we immediately start ASA after this first boot, it freezes (don’t really know why but it seems the system do something and slow down during the first minute …). The next time you start the system, the script will still load the activate the network interfaces and automatically start ASA.
#!/bin/sh
 
##
## Author: Jeremy Grossmann (2009)
## Contributor: J. Pedro Flor (28 january 2010)
##
 
FIRST_START=no
if test ! -e /mnt/disk0/lina_monitor
then
cd /asa/scripts/
echo "d" > /asa/scripts/fdisk.pf.in
echo "o" >> /asa/scripts/fdisk.pf.in
echo "n" >> /asa/scripts/fdisk.pf.in
echo "p" >> /asa/scripts/fdisk.pf.in
echo "1" >> /asa/scripts/fdisk.pf.in
echo ""  >> /asa/scripts/fdisk.pf.in
echo "t" >> /asa/scripts/fdisk.pf.in
echo "4" >> /asa/scripts/fdisk.pf.in
echo "w" >>/asa/scripts/fdisk.pf.in
 
echo ""
echo -n "Initializing partition..."
/sbin/fdisk /dev/hda < /asa/scripts/fdisk.pf.in > /dev/null 2> /dev/null
echo "done"
 
echo ""
echo -n "Formating and mounting partition..."
mkdosfs -F 16 /dev/hda1 > /dev/null 2> /dev/null
mount -t vfat -o umask=0000,noatime,check=s,shortname=mixed /dev/hda1 /mnt/disk0 > /dev/null 2> /dev/null
echo "done"
echo ""
 
cp /asa/bin/lina /mnt/disk0/lina
cp /asa/bin/lina_monitor /mnt/disk0/lina_monitor
FIRST_START=yes
fi
 
# load drivers
modprobe e100
modprobe e1000
ifconfig eth0 up
ifconfig eth1 up
ifconfig eth2 up
ifconfig eth3 up
ifconfig eth4 up
ifconfig eth5 up
 
if test $FIRST_START = yes
then
echo ""
echo "          Cisco ASA with Multiple Security Contexts"
echo "          =============================================="
echo ""
echo "This is your first boot, please wait about 2 minutes for 'disk0' creation"
echo "and then execute the following commands inside the Linux prompt:"
echo ""
echo " # cd /mnt/disk0"
echo " # /mnt/disk0/lina_monitor"
echo ""
echo ""
echo ""
echo "Please note to use the following command under ASA to save your configs:"
echo ""
echo " ciscoasa(config)# boot config disk0:/.private/startup-config"
echo " ciscoasa(config)# copy running-config disk0:/.private/startup-config"
echo ""
echo ""
echo ""
echo "To get webvpn working, execute the following commands:"
echo ""
echo " ciscoasa# mkdir disk0:/var"
echo " ciscoasa# mkdir disk0:/var/log"
echo " ciscoasa# mkdir disk0:/csco_config"
echo " ciscoasa# mkdir disk0:/csco_config/97"
echo " ciscoasa# mkdir disk0:/csco_config/97/webcontent"
echo ""
echo "          ( Powered by Pedro Flor )"
echo "          ( pedro.flor@gmail.com  )"
echo ""
exit
fi
 
echo ""
echo ""
echo "Starting Cisco ASA with Multiple Security Contexts..."
echo ""
 
cd /mnt/disk0
/mnt/disk0/lina_monitor
In order for the script to be loaded at startup, edit etc/init.d/rcS and change /asa/bin/lina_monitor by /asa/scripts/first_start.sh
Change first_start.sh permissions:
chmod 755 first_start.sh
Now you can compress all the file and have the initrd ready to use in Qemu:
find . | cpio -o -H newc | gzip -9 > ../asa802-k8.initrd.gz

Automated extraction method

TODO

Using ASA with Qemu

Create a FLASH (this is a virtual hard disk).
qemu-img create FLASH 256M
Then you can start Qemu.
qemu -hda FLASH -kernel asa802-k8.kernel -hdachs 980,16,32 \
-initrd asa802-k8.initrd.gz -m 512 -no-kqemu -nographic -append \
"console=ttyS0,9600n8 hda=980,16,32 bigphysarea=16384 auto nousb ide1=noprobe"
TODO: networking of ASA. Very similar with JunOS emulation.

Using ASA with GNS3

To be completed:
In Preferences -> Qemu -> Qemuwrapper section:
Set the path to Qemuwrapper (can be found in the GNS3 package)
Set the working directory (e.g. /tmp).
Set the path to your patched Qemu in “Path to Qemu”
In ASA section:
Set the paths to your initrd and kernel.
Drag and Drop an ASA symbol on the scene, start the firewall and telnet to it.